

How To Draw A Route Sketchup
Drawing Basic Shapes
Many models start with bones shapes. In SketchUp, the shape tools assistance you draw rectangles, circles, and polygons. You find these tools on the Getting Started toolbar, the Drawing toolbar, and the Large Tool Set toolbar.
Table of Contents
- Cartoon a rectangle or square
- Drawing a rotated rectangle
- Drawing a circle or ellipse
- Drawing a polygon
- Editing shapes
Drawing a rectangle or square
In SketchUp, you tin can draw rectangles pretty much anywhere:
- On the ground airplane
- On a vertical plane
- On existing faces
- Separate from existing geometry (aligned to an axes airplane)
- Inferenced from existing geometry
To draw a rectangle with the Rectangle tool, follow these steps:
- Select the Rectangle tool (
 ) from the toolbar or press the R fundamental. The cursor changes to a pencil with a rectangle.
 Tip: To start over at any point during these steps, press Esc.
- Click to set the first corner bespeak of the rectangle. .
- Click to gear up the first corner point of the rectangle. To marshal the plane of your rectangle with a specific cartoon axis or other geometry, press the arrow key that corresponds your desired alignment, as explained subsequently in this section.
- Click to ready the commencement corner point of the rectangle. To marshal the plane of your rectangle with a specific cartoon axis or other geometry, press the arrow primal that corresponds your desired alignment, as explained later in this section. If you prefer to depict the rectangle from the heart, press the Ctrl fundamental (Windows) or the Option key (macOS).
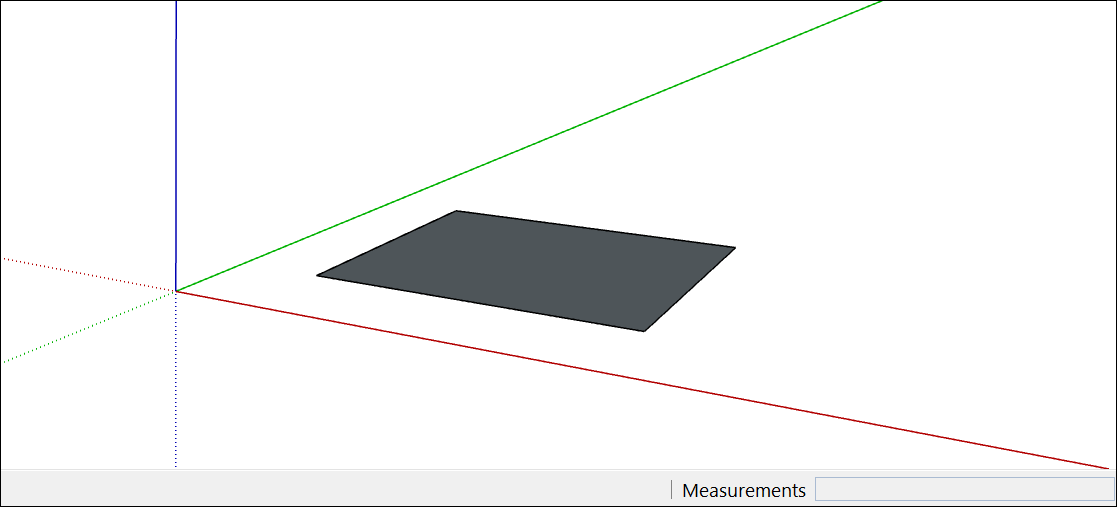
- Movement the cursor diagonally to detect the desired size and shape for your rectangle. To draw the rectangle with precise dimensions, use the Measurements box, which at this bespeak displays your rectangle'southward dimensions as you move the cursor. To help y'all place the rectangle in relation to the drawing axes or other geometry, SketchUp's inference engine displays on-screen cues. When the inference you need appears, movement to Pace 4. Both the Measurements box and the Rectangle tool inferences are explained a niggling afterwards in this department.
- Click over again to set the second corner point of the rectangle. Your shape appears with a face up, as shown in the following figure.
- Click again to set the second corner point of the rectangle. Or if you're drawing the rectangle from center, click once more to set whatever corner bespeak. Your shape appears with a confront, as shown in the following figure.
Equally you draw a rectangle, the Measurements box helps you model precisely as follows:
- Prepare the length and width. Blazon a length value, a comma, a width value, then press Enter. For example, blazon 8',20' and printing Enter. If you type simply a number or numbers, SketchUp uses the current document units setting. You lot can too override the document units setting by specifying royal (such equally ane'6") or metric (such equally 3.652m) units.
- Specify only a length or width. If you enter a value and a comma (3',), the new value is applied to the first dimension, and the second dimension doesn't change. Similarly, if you blazon a comma then a value (,3'), only the second dimension changes.
- Change the rectangle'southward position with negative numbers. If you enter a negative value (–24, –24), SketchUp applies that value in a management reverse to the i that you indicated while drawing.
Tip: You don't need to click in the Measurements box before you lot type a value. Every bit y'all draw, the Measurements box is waiting for you lot to type precise measurements if you choose to practise then. Also, until yous select another tool or draw another rectangle, yous can use the Measurements box to change a rectangle's dimensions as many times as yous like.
Annotation: If you're using a not-English keyboard, employ a comma to indicate the decimal place and a semi-colon to split up the dimensions. For instance, you might enter 2 sides of a rectangle as: vii,6m;4,3m
Equally you lot move your cursor with the Rectangle tool selected, the SketchUp inference engine displays the following cues:
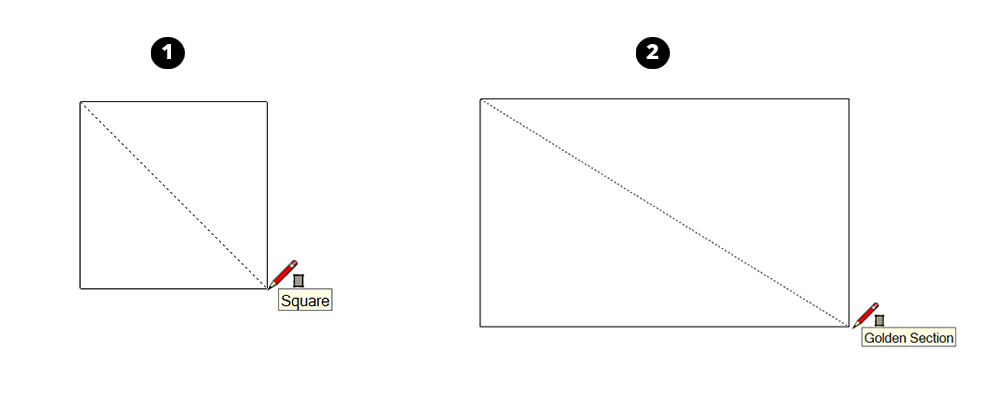
- Foursquare: When the rectangle'southward proportions are a perfect square, you see blueish dots and the Foursquare ScreenTip announced. See Callout i.
- Golden section: A golden department is a rectangle in which the ratio of the longer side to the shorter side is a gilt ratio. When a rectangle is a golden section, bluish dots and the Gilt Section Screen tip announced. See Callout two.
Y'all can concord down the Shift central to lock this inference while dragging.
In the video, you can see these features of the Rectangle tool in action.
Drawing a rotated rectangle
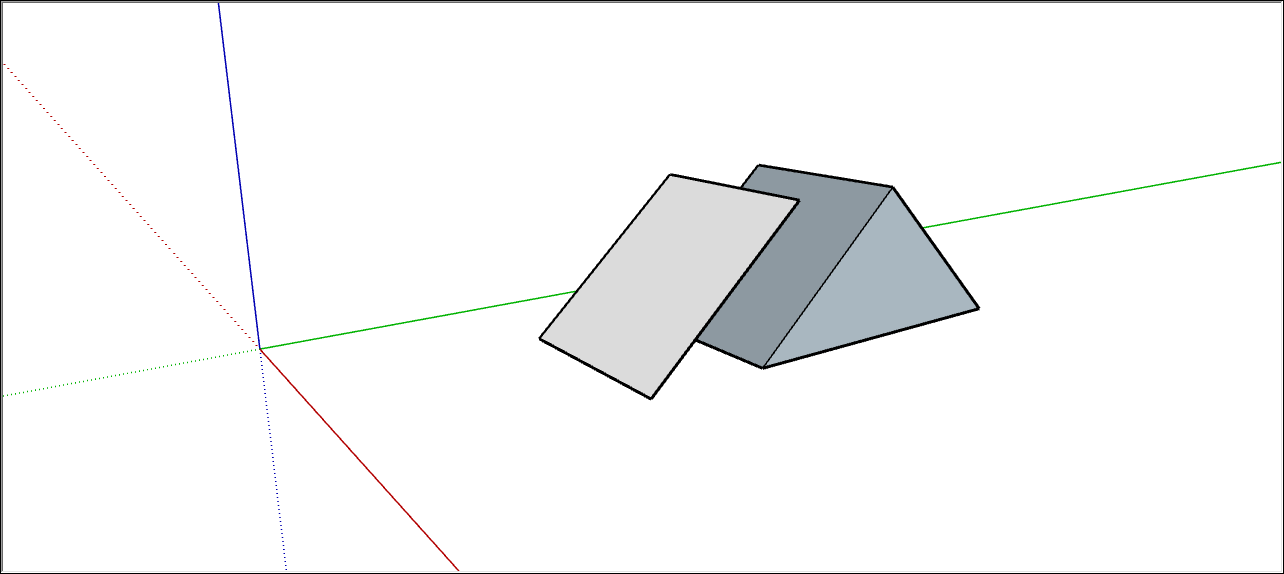
The Rotated Rectangle Tool tin can come in handy when y'all need to draw a rectangle whose face is at an angle to SketchUp's default cherry, greenish, or blue axes or to other geometry.
Similar the Rectangle tool, the Rotated Rectangle tool enables yous to create precise rectangles and squares and displays inferences to help you as you draw. Withal, when you lot create a rectangle with the Rotated Rectangle tool, you position the rectangle at an angle as well. The following figure is an example of a rectangle created with the Rotated Rectangle tool.
To create a rotated rectangle, follow these steps:
- On the toolbar, from the Shape Tools menu, select the Rotated Rectangle tool (
 ). Or select Draw > Shapes > Rotated Rectangle from the carte bar.
 - (Optional) Press an arrow central to prepare the airplane for your rotated rectangle, per the table that appears earlier in this article. For example, press the left pointer cardinal to constrain the plane of your rotated rectangle to the green plane.
- Click once to gear up the first corner of your rectangle.
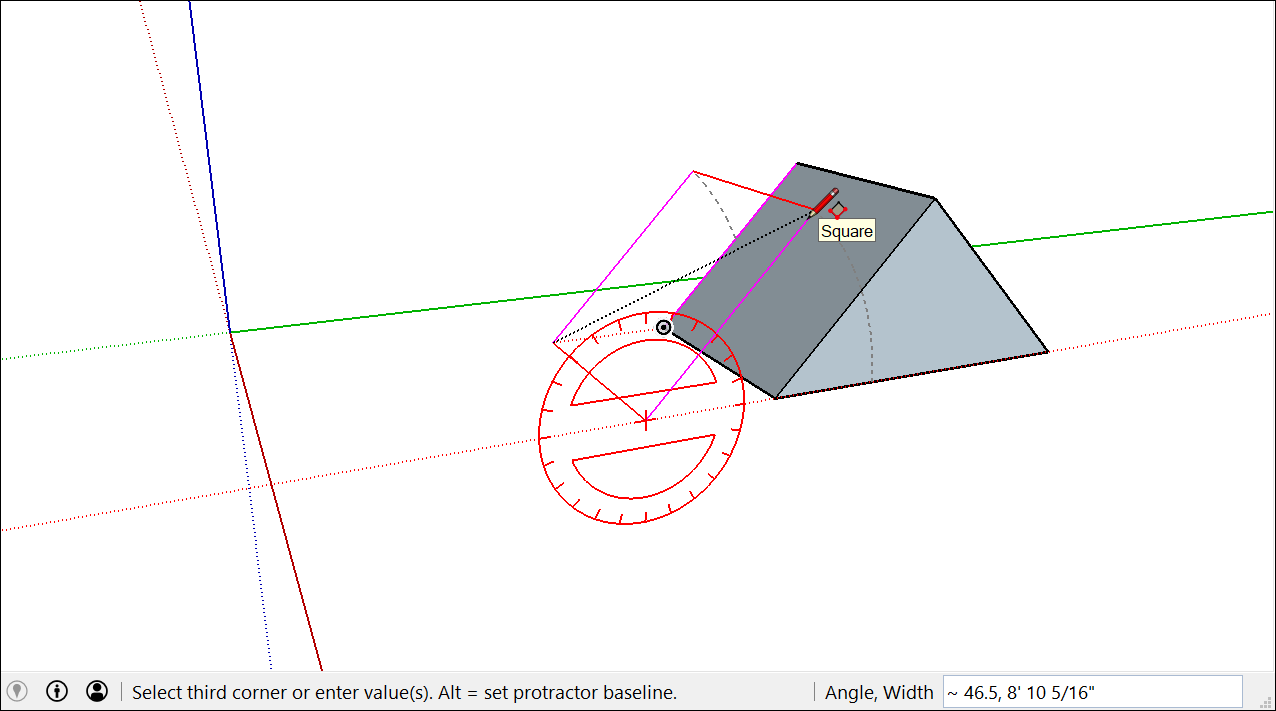
- Create the starting time border of your rotated rectangle. Y'all tin do this in ii ways:
- Type a precise measurement and printing Enter.
- Or move the cursor where y'all want to place the second endpoint of this border, using the SketchUp inference engine to position the endpoint in relation to the axes or other geometry, as shown in the following figure, so click.
Tip: You can use a few modifier keys as y'all complete this step. Hold down the Shift key to constrain the first edge to its current direction. The Alt (Windows) or Command (macOS) cardinal locks the protractor plane. Or the arrow keys can over again help you align the first border to an axis. Merely press the arrow fundamental that corresponds your desired alignment, as explained before in this department. For instance, press the right pointer key to constrain the first edge then it'south aligned with the red axis.
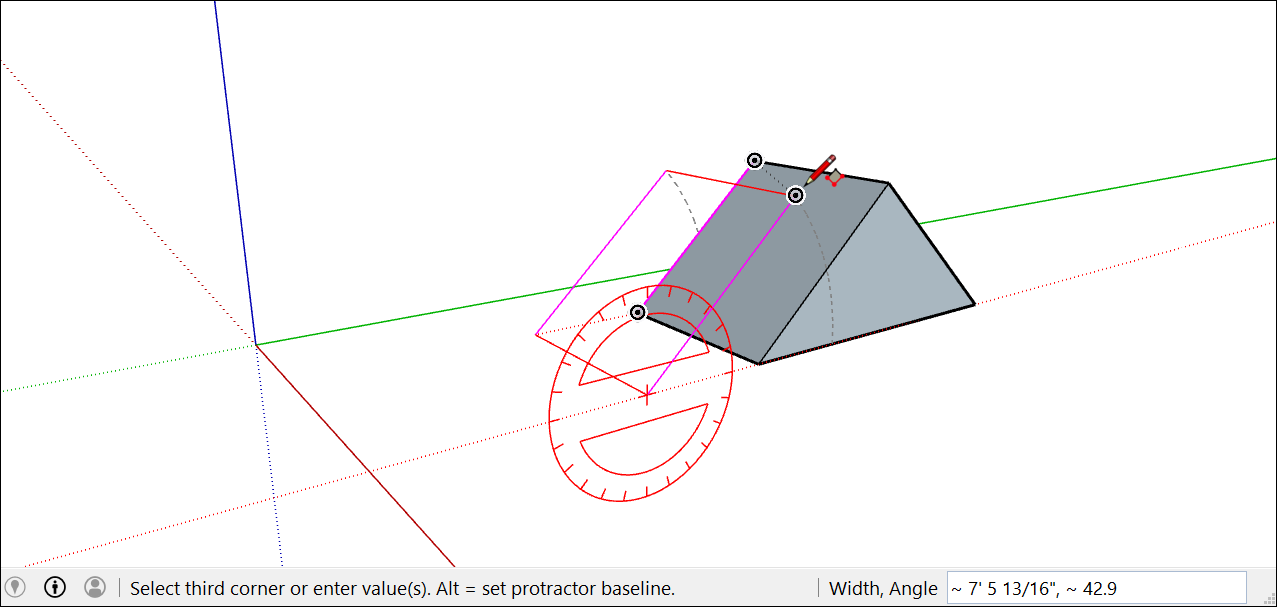
- At this indicate, you set the width and bending of your rectangle. Yous can gear up these values in a few unlike ways:
- Type an angle and width into the Measurements box, post-obit the prompt.
- Type a width and angle into the Measurements box, post-obit the prompt.
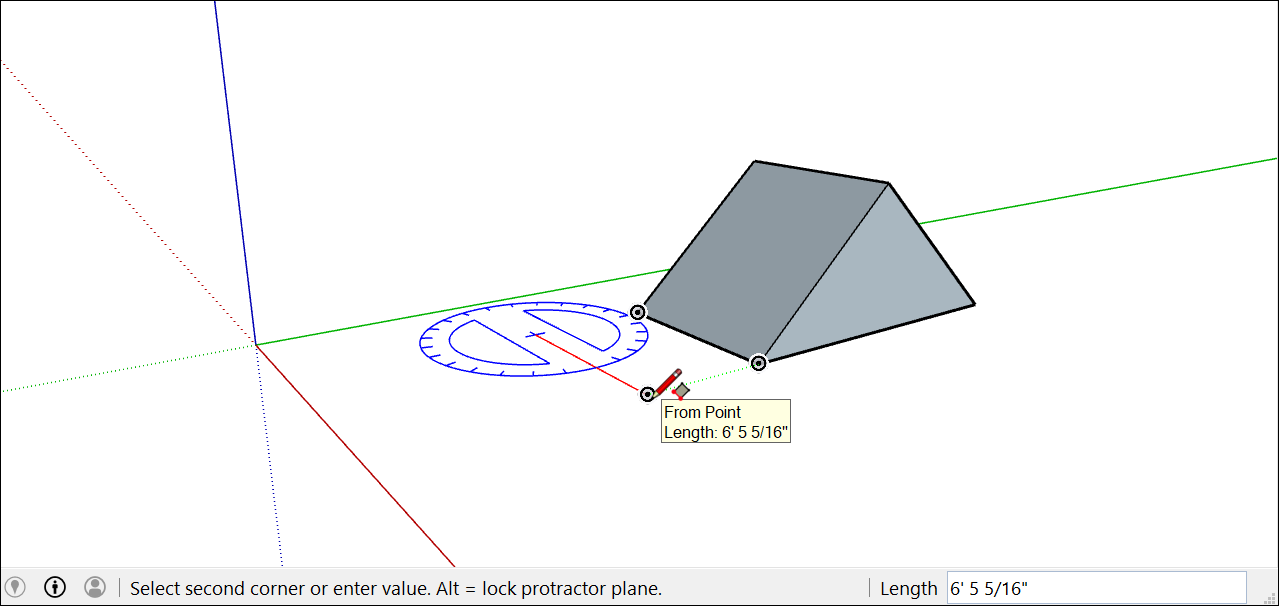
- Move effectually the protractor to set the angle, and move your cursor away from the center of the protractor to set the width, equally shown in the following figure. To constrain the angle, hold down the Shift key. Click to finish creating the rotated rectangle.
Tip: Press the Alt (Windows) or Command (macOS) key to gear up the protractor baseline at the cursor's electric current position and and then move the cursor to measure the angle from the baseline you set. This method is helpful if you want to measure the angle from a betoken other than the baseline set in Pace iii. A dashed line appears and so you can encounter the new baseline.
Note: if you're using a non-English keyboard, yous'll want to use a comma to indicate the decimal place and a semi-colon to separate the values in the Measurements box. For example, you might enter the angle and width of the 2nd border every bit 43,2;viii,2m to get an angle that'south 43,2 degrees and viii,two meters long.
Note: if you're using a not-English language keyboard, you lot'll want to utilize a comma to indicate the decimal place and a semi-colon to separate the values in the Measurements box. For instance, yous might enter the width and bending of the 2d edge as eight,2m; 43,2 to get a width that's 8,ii meters long and angle that'southward 43,2 degrees .
Drawing a circle or ellipse
Earlier y'all draw a circle, it's helpful to sympathise how SketchUp creates circle entities:
- Circumvolve entities have a radius and connect multiple line segments.
- These segments act as a unmarried line in that they can define the border of a face and separate a face. Additionally, selecting i segment selects the entire circle entity.
- SketchUp's inference engine still sees the segments in the circle. And so, if you hover your mouse around the circumference of the circle entity, you'll come across endpoint and midpoint inferences.
To describe a circle, follow these steps:
- On the toolbar, select the Circle tool (
 ) from the drop-down menu adjacent to the Rectangle tool. Or printing the C key. The cursor changes to a pencil with a circle, and the Measurements box indicates the default number of sides: 24, as shown in the figure. To change the number of sides, you tin can type a value now or wait until later you're done drawing the circle.
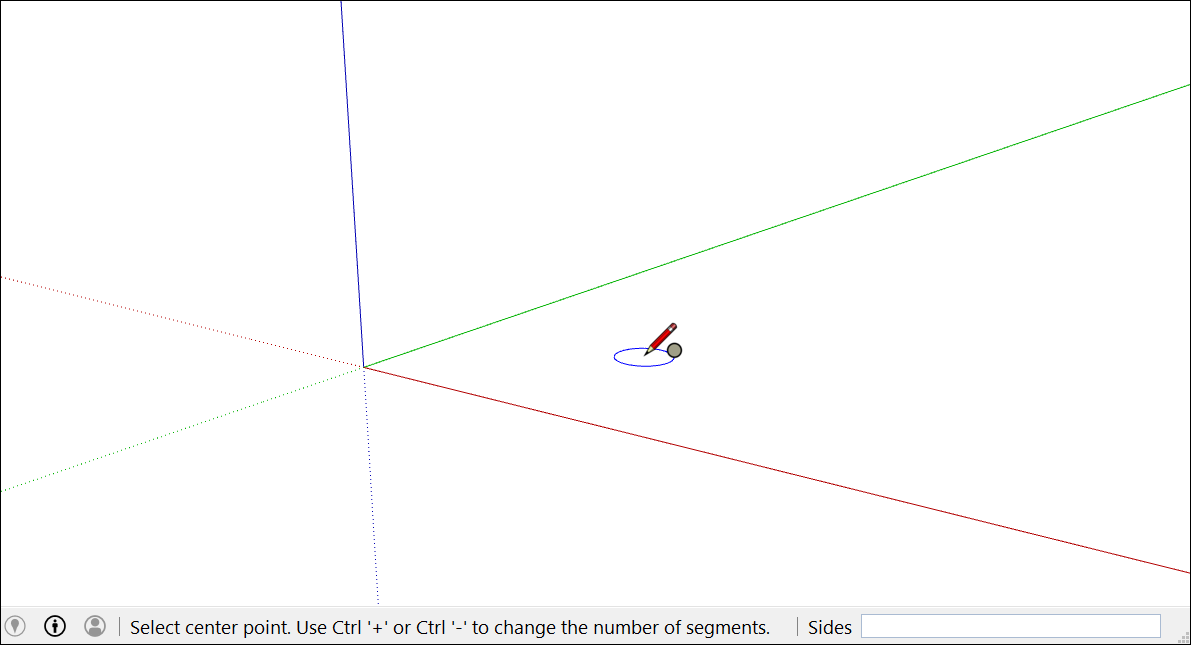
- Click to identify the eye point of the circumvolve. The Measurements box changes to brandish the circumvolve'southward radius. Yous tin can blazon a radius value now or immediately after you draw the circle.
- Click to place the center point of the circumvolve. To marshal the plane of your circumvolve with a specific drawing axis or other geometry, press the arrow cardinal that corresponds your desired alignment. For case, the up arrow aligns the circle's plane with the blue axis. Run into the tabular array in Drawing a rectangle or square for details.The Measurements box changes to display the circumvolve's radius. You can blazon a radius value now or immediately after you lot draw the circumvolve.
- Motility the cursor out from the center point to define the circumvolve's radius. As you move the cursor, the radius value is displayed dynamically in the Measurements box. Printing Esc at whatever point to start over.
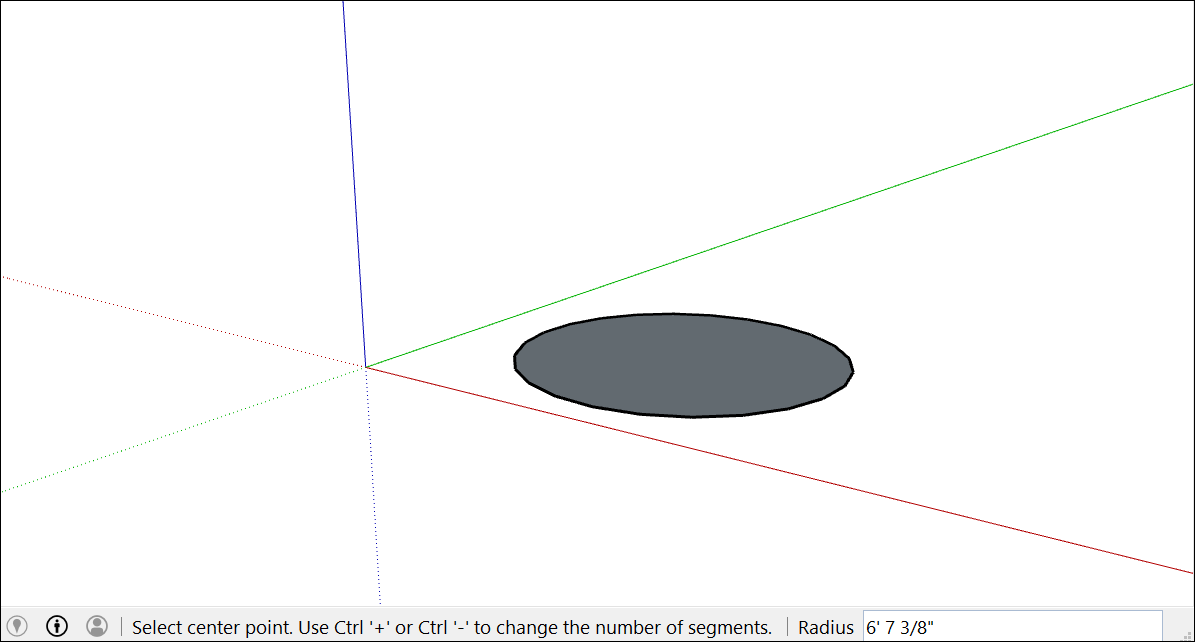
- Click to finish the circle. SketchUp creates a circle-shaped face, equally shown in the effigy.
- (Optional) Until you select a new tool or draw a new circumvolve, y'all can utilise the Measurements box to change the circumvolve'south radius or the number of sides equally follows:
- To change the number of sides: Type a number and the letter S (for example, type 5s for 5 sides or 42s for 42 sides). Then printing Enter.
- To alter the number of sides: Type a number and the letter S (for case, type 5s for 5 sides or 42s for 42 sides). And then press Enter. Alternately, you tin can agree downwardly the Ctrl central (Microsoft Windows) or the Option key (macOS) while pressing the + or - to increase or subtract the number of sides, respectively. If you're using a French Canadian keyboard, concur down the Ctrl fundamental (Microsoft Windows) and the +/= key to increase the segments. For macOS, press Command and = to increase segments or - to decrease segments.
- To change the radius: Type a number and a unit (if desired), such as 6", eight', 34cm, or 7m. Then printing Enter or Render.
Tip: The Entity Info dialog box offers a handy manner to edit the sides and radius values anytime. Run across Editing shapes later in this commodity for details.
To draw an ellipse or oval, follow these steps:
- Draw a circle with the Circle tool.
- Select the Scale tool (
 ).
). - Click the circle. A bounding box with eight dark-green grips is displayed around the circle.
- Click one of the middle grips (non one of the corner grips) and motility the mouse to pull the circle into an ellipse, as shown here.
- Click over again when you're done scaling the circle.

Cartoon a polygon
You can create polygon entities with the Polygon tool. (No surprise there.) However, here are a few facts that you may non know near polygons, just that are handy to know as you draw them:
- In SketchUp, a polygon has a radius and 3 or more sides. Then the size of your polygon is measured from a center bespeak, and the number of sides determines the type of polygon you draw. A pentagon as v sides; an octagon has viii sides.
- Polygon entities human activity as a single line in that they can define the edge of a face up and also divide a face. Selecting ane side of the polygon selects the entire polygon.
- The SketchUp inference engine interprets each side of a polygon as a segment. As you hover your cursor over a polygon, y'all meet endpoint, midpoint, and from point inferences.
- You tin draw polygons on faces or separate from existing geometry.
Follow these steps to describe a polygon:
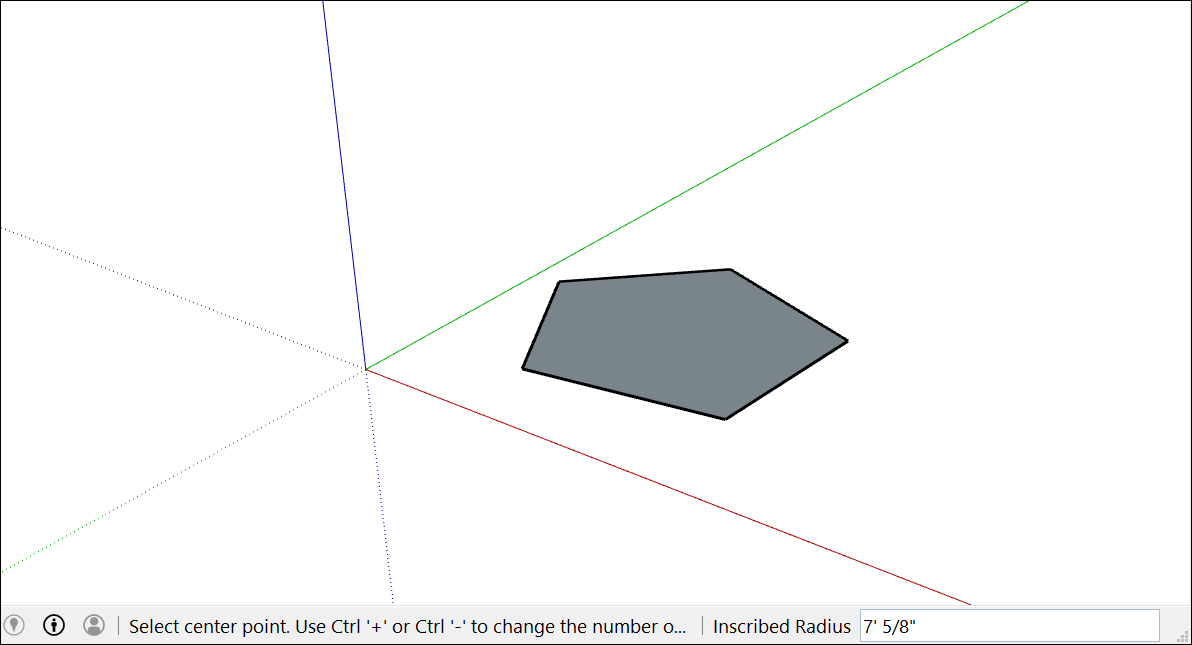
- Select the Polygon tool (
 ) on the toolbar. The cursor changes to a pencil with a polygon. The Measurements box indicates the current number of sides. To change the number of sides in your polygon, you tin can type a number value at present or expect until later you're done drawing.
 - Click to place the eye point of the polygon. The Measurements box changes to display the radius. Yous can blazon a radius value now or immediately after you depict the polygon.
- Click to place the eye point of the polygon. To align the airplane of your polygon with a specific drawing axis or other geometry, press the arrow key that corresponds your desired alignment. For example, the upward arrow marshal's the polygon'southward plane with the blue axis. Run across the earlier table in Cartoon a rectangle or square for details.The Measurements box changes to display the radius. You tin can type a radius value now or immediately after you draw the polygon.
- Movement the cursor out from the center indicate to define the radius of your polygon. As you move the cursor, the radius value is displayed dynamically in the Measurements box. To specify the radius, type a value and printing Enter. You can also press Esc to start over.
- Click a second time to finish the polygon. Hither, you lot run across a 5-sided polygon.
- (Optional) Until y'all select a new tool or depict a new polygon, you can use the Measurements box to alter the radius or the number of sides every bit follows:
- To change the number of sides: Blazon a number and the letter Southward (for example, blazon 5s for 5 sides or 42s for 42 sides). And so press Enter.
- To change the number of sides: Type a number and the letter S (for example, type 5s for 5 sides or 42s for 42 sides). Then printing Enter. Alternately, you tin can concur down the Ctrl central (Microsoft Windows) or the Choice fundamental (macOS) while pressing the + or - to increase or subtract the number of sides, respectively. If you're using a French Canadian keyboard, hold down the Ctrl key (Microsoft Windows) and the +/= key to increase the segments. For macOS, press Command and = to increase segments or - to decrease segments.
- To change the radius: Type a number and a unit (if desired), such as 6", 8', 34cm, or 7m. Then press Enter or Return.
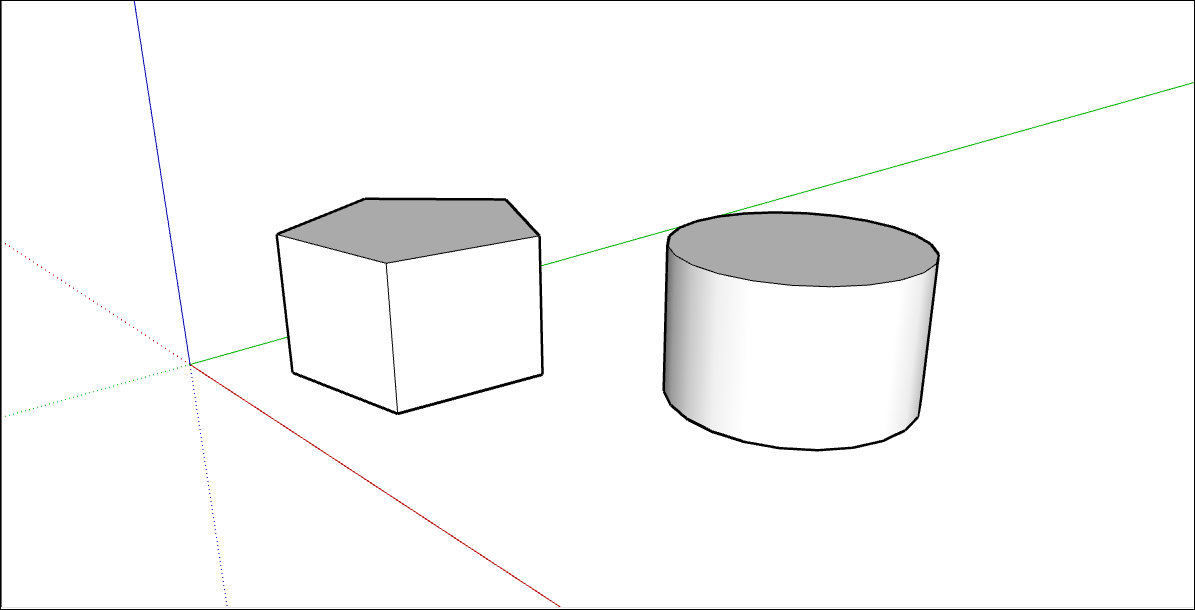
Tip: Although the Polygon tool works similarly to the Circle tool, the departure between the tools becomes apparent when y'all push/pull a circle or polygon into a 3D shape. The circle's edges look shine, but a polygon's edges show distinct sides, as shown hither.
In this alive-activity video, you lot tin can run into the Circumvolve and Polygon tools demonstrate all their stunts.
Editing shapes
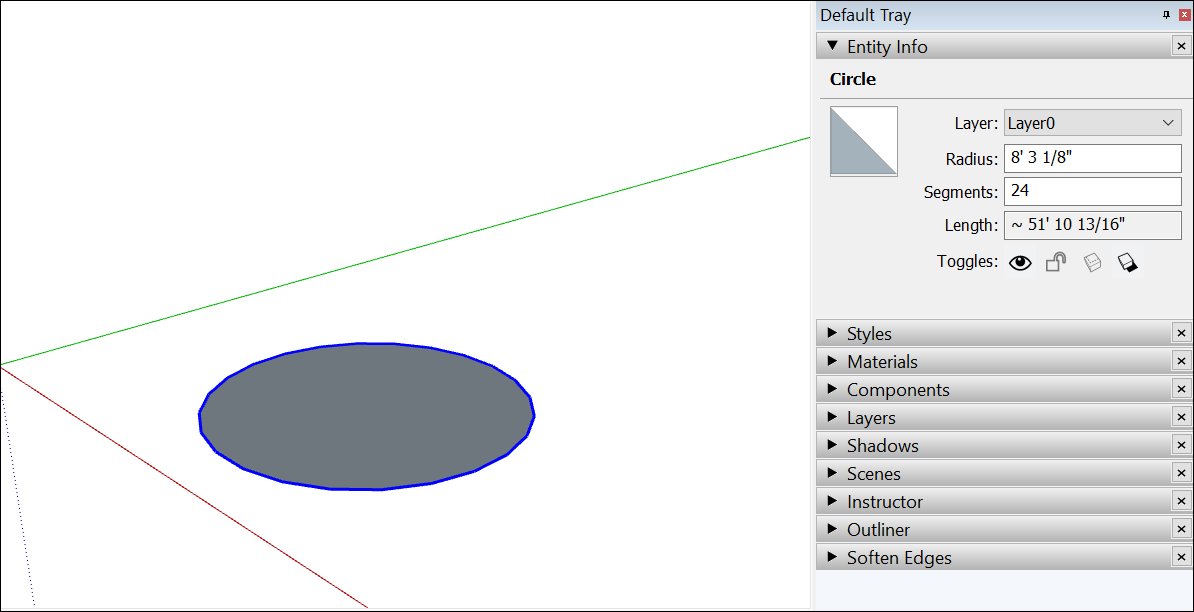
The Entity Info dialog box enables you to change a circle or polygon'due south radius or sides anytime later on you create the shape. Here's how:
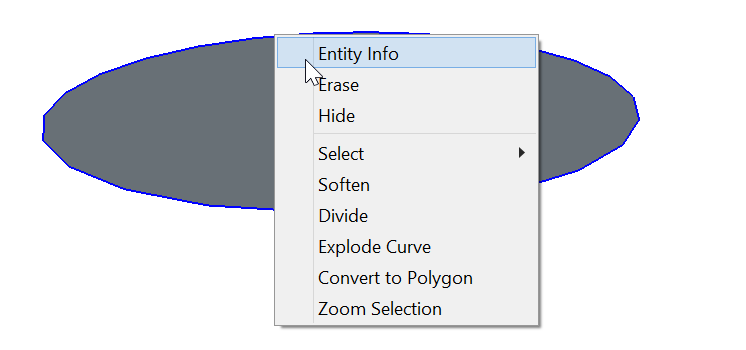
- Context-click an border (non the confront) of a circle or polygon that you want to edit.
- Select Entity Info from the context bill of fare that appears, as shown here.
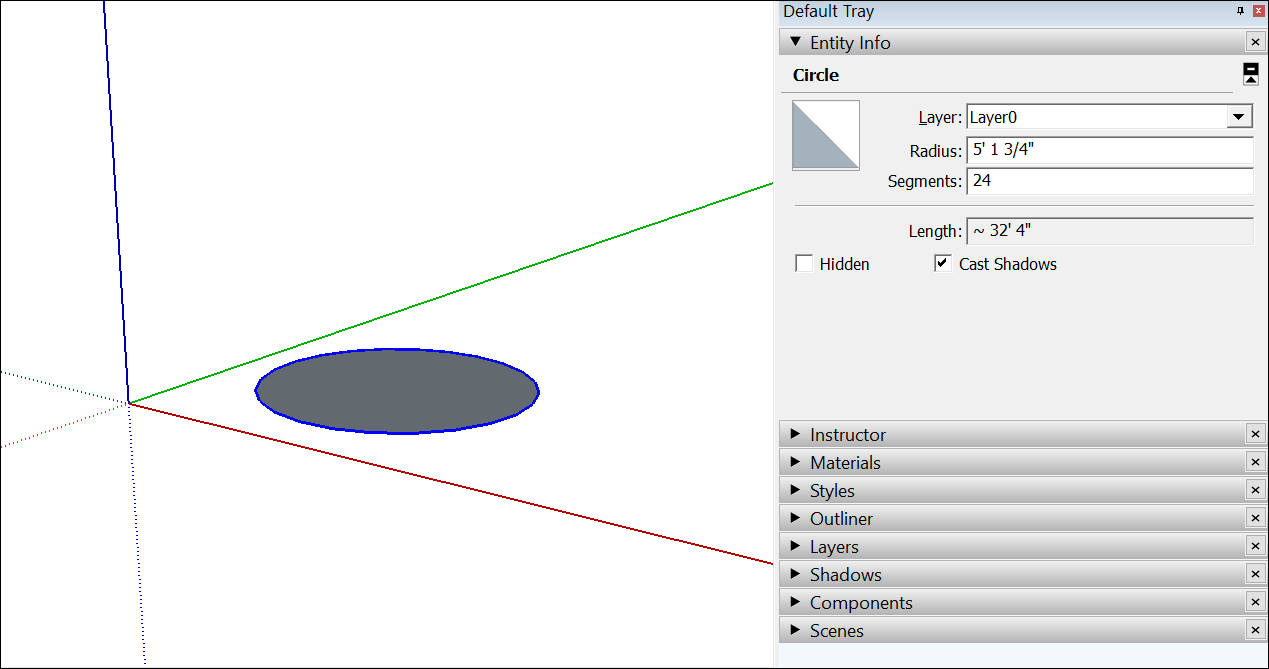
- In the Entity Info console, click in the Radius or Segments box, change the value, and press Enter (Microsoft Windows) or Return (Mac). After you lot press Enter or Return, your shape immediately reflects your changes.
SketchUp doesn't enable you to change the width or length of a rectangle at someday. If yous've already selected some other tool or fatigued additional rectangles, yous demand to erase the rectangle you want to change and redraw it. See Drawing a rectangle for details. Or resize the rectangle with the Scale tool if yous don't need to enter precise dimensions.
Of class, yous tin do much more than only change a shape'southward size. You tin can turn a 2d shape into a 3D shape with the Push button/Pull tool. You tin distort shapes with the Move tool or scale all or part of your model.

Source: https://help.sketchup.com/hu/sketchup/drawing-basic-shapes
Posted by: goddardpaptur.blogspot.com
0 Response to "How To Draw A Route Sketchup"
Post a Comment