

How To Convert Autocad Into A Template
Open Source AutoCAD Template
Here is I Community's open source AutoCAD® template and tutorial folio. The purpose of this open source template is to provide a well-organized format for AutoCAD® files and layers. We've used this to update all 7 of our hamlet models and the Duplicable City Center®. Hither are the sections of this page sharing the conversion and standardization process using this template:
- What is an Open Source AutoCAD Template
- Why Create an AutoCAD Template
- Means to Contribute to this Open Source Component
- Key Consultants to this Component of One Community
- AutoCAD Template Instructional for Use and Converting Existing Files
- File Download
- Stride-by-step Process for Converting an Existing AutoCAD File
- Blocks
- Drawing
- Text
- Dimension Styles
- Resources and Boosted Tips
- Summary
- FAQ
WHAT IS AN Open SOURCE
AUTOCAD TEMPLATE
 This open source AutoCAD® template and tutorial includes the file download and instructions for using One Customs's standardized AutoCAD format. The Template File includes our Title Cake format, standardized layer names and line weights, and most commonly used symbols inside all our drawings. We likewise created the format with non-AutoCAD users in heed, using colors that show upward well in screenshots and fonts that testify upwardly appropriately when using Autodesk's free online file viewer.

File Includes Detailed Instructions for AutoCAD Template Use – Click for the Gratis File Download
WHY CREATE AN AUTOCAD TEMPLATE
A standardized AutoCAD template was eventually desired then that our file names, drawing scales, symbols, layers and layer names, and colors and line weights would lucifer all our open source designs and the open source designs of others using our designs every bit a starting point and wanting us to share their work too. Working with a global team of volunteers not using a standardized format led to huge differences throughout our files. This became extremely problematic when trying to merge related files from different people. We also had issues because our team includes many non-AutoCAD users who needed to give feedback but simply viewed these files using screenshots or Autodesk'due south free online file viewer, so nosotros needed fonts and colors that worked well for both situations. Another issue was some of our files required different disciplines in 1 file and we needed a broad diversity of colors that were appropriately chosen to maintain clarity when at that place were more disciplines and designs in 1 file than a typical design.

File Includes Pre-divers Layouts for Printing and PDF Cosmos – click for the free file download
Ways TO CONTRIBUTE TO EVOLVING THIS SUSTAINABILITY COMPONENT
SUGGESTIONS ● CONSULTING ● MEMBERSHIP ● OTHER OPTIONS
CONSULTANTS ON THIS COMPONENT OF ONE Community
Adrienne Gould-Choquette: Mechanical Engineer
Shilcy Augustine: Architect
AUTOCAD TEMPLATE USE AND HOW TO
Convert EXISTING FILES
 Here are instructions for using this open source AutoCAD template. They are formatted to cover all possibilities by outlining the specific process needed to catechumen an old AutoCAD .dwg file to the new format described here and included within the AUTOCAD_TEMPLATE_MASTER_mm-dd-yy.dwg file. The Template File also includes basic employ instructions for anyone not interested in converting a file and/or get-go a new projection.
To begin, download the Template File here:
CLICK THIS LINK TO ACCESS THE SHARED Drib BOX AND DIRECT DOWNLOAD THE FILE*
* The information in these files is provided exclusively in accordance with our Terms and Conditions
STEP-Past-Footstep Procedure FOR CONVERTING AN EXISTING FILE
Time for conversion of a file varies but budget about 3 hours for a standard sized drawing.
- Kickoff past downloading and opening the most current AUTOCAD_TEMPLATE_MASTER_mm-dd-yy.dwg
- Use the Save Every bit control (PC: Ctrl+Shift+S , MAC: Command+Shift+South ) to save the drawing in the format:
VILLAGE_DISCIPLINE_mm-dd-yy.dwg
Case: EARGHBAG_ARCH-02-07-17
(Reference the template drawing for the list of chief disciplines.)
- Spend a few minutes looking over the layer names which have been listed on the document; noting that all layers are capitalized, and all kickoff with the primary bailiwick designation followed by the secondary subject area designation. This footstep will help you readily identify template layers versus non-template layers.

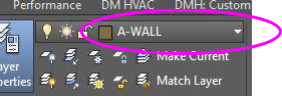
- In the document to exist converted, brand sure all layers are visible and unlocked . To do this, click on the layer properties button from the Abode Ribbon:
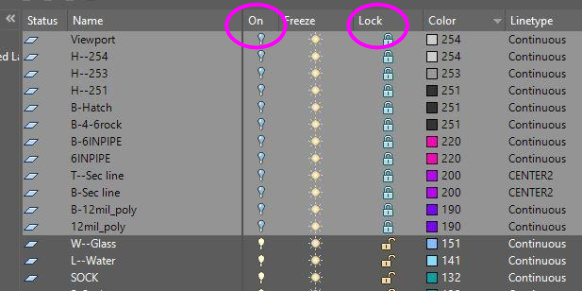
- Sort the layer list past "On" and change any layers which are not on by clicking on the light bulb to plow them on (clicking the give-and-take "On" ii times volition sort first ascending and then descending club)
Echo this by sorting the list for locked layers "Lock", and clicking on the lock for all layers which are locked.
- Copy and paste everything from your existing document into the certificate you created in step two by selecting all (PC: Ctrl+A, MAC: Command+A) and copying from the old document and pasting into the new document (PC: copy: Ctrl+C; paste: Ctrl+5) (MAC: copy: Command+C; paste: Command+5)
- Salve your document. (PC: Ctrl+Shift+South, MAC: Command+S ). You may now close your old document. You will non be using it.
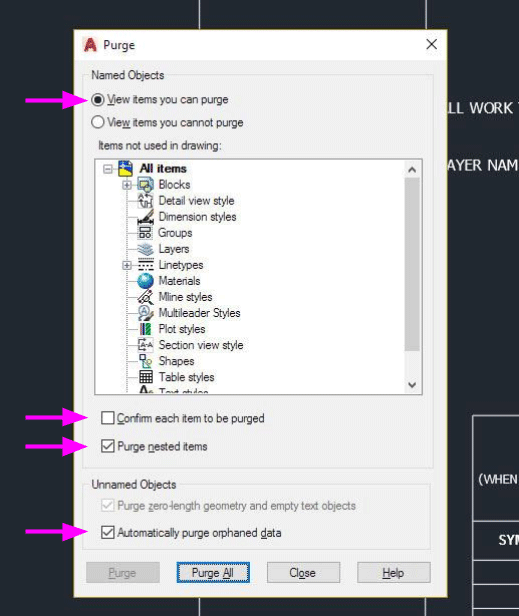
- At the command prompt type: PURGE
This will purge everything in your document that you are not using and make subsequent cleaning up of the certificate easier
- Select: View items you can purge
- Select: Purge nested items
- Select: Automatically purge orphaned data
- Optional Selection: Ostend each item to be purged
- Click: Purge A ll button
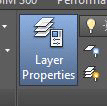
- From the Domicile ribbon, click on the Layer Properties icon to review your layers list. Remember template layers are all upper instance and begin with a primary disciple designation (e.one thousand., A-TXT); all other layers have to be moved using the methods beneath.
- Save your document. (PC: Ctrl+Shift+S , MAC: Control+S)
- At the command prompt blazon: LAYMRG
a. Type North to get the list of Layers to Merge (this would be the old layers)

b. Review any layer that can exist immediately merged without further investigation (e.g. Old layer: A-Doors, New layer: A-DOOR, eastward.g., One-time Layer: I-furniture, New Layer: A-FURNITURE). Hold down the Ctrl/Command key to Select multiple layers:
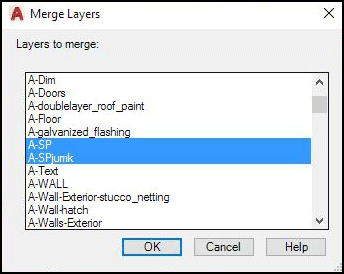
c. Select the old layer name(s) and enter OK
d. **Striking the Enter key to evidence that y'all have completed selecting Layers to Merge**
e. When prompted to Select object on target layer or [Name]:, blazon Northward
f. Select the Target layer (this is the new layer) and enter OK

m. It volition ask you to confirm. Select Aye
h. Repeat until there are no additional layers to merge
- Periodically review your layer list to see how much conversion remains. This is a good fourth dimension to review the layers by clicking on the Layer Properties icon on the Habitation ribbon.
- Periodically employ the PURGE command to get rid of components you lot have already addressed. This is a good time to PURGE . (See instruction number 8 for more than details about purging your certificate)
- Save your certificate. (PC: Ctrl+Shift+S , MAC: Command+S )
AUTOCAD BLOCKS
- BLOCKS:
When editing blocks, it is recommended to keep the Properties window open up. Blazon Properties at the command line to open the Backdrop window.
-
- Brand certain all block names are intuitive. To change a block name apply the RENAME command. Select:

- Blocks
- The old item whose name you wish to change, and
- Enter the Rename To value.
- Click the Rename To push.
- Continue for all blocks which need renaming
- Click OK when done
- Notation : If you need to view a Block in order to requite a descriptive proper name to it, you tin can exit out of the Edit Cake Definition window by clicking OK and use the BEDIT command at the command prompt to preview the block and meet a description (if one was included at the time the cake was created). Yous tin now abolish out of the Edit Block Definition Window and return to the Rename window to continue renaming blocks.
- Brand certain all block names are intuitive. To change a block name apply the RENAME command. Select:

-
- Reassign all drawing blocks to an existing standard template layer (or newly created layer following the template guidelines for layer naming convention described in the AUTOCAD_TEMPLATE_mm-dd-yy.dwg file). By **double clicking on the block in the drawing, and selecting the proper layer from the LAYER drop downwards menu on the home ribbon.
**You tin either access blocks past double clicking on them in the drawing, or typing QSELECT at the command prompt and selecting the appropriate cake.

-
-
- Apply to: Entire drawing
- Object Blazon: Block Reference
- Properties: Proper noun
- Operator: = Equals
- Value: Select the block yous want to change.
- Select OK (now the block with that name is selected)
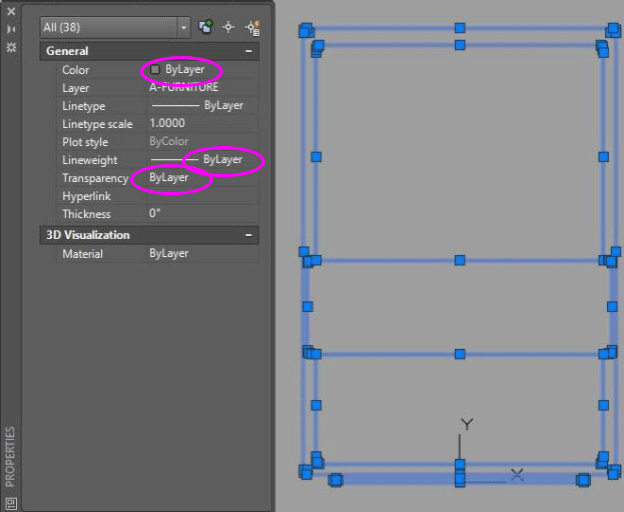
- Now from the home ribbon click on the LAYER dropdown bill of fare and select the correct layer that the block should reside. In this example, SP0 is a bed and should be moved to the A-Piece of furniture Layer
-
-
- Edit every block in the drawing: Type BEDIT at the control line. Double click a block.

- Move all components inside the block to standard template layers by clicking on an element in the drawing and selecting the proper layer from the LAYER dropdown carte on the dwelling house ribbon.
- Ensure all layers within blocks have the properties listed below set to ByLayer (easiest way to exercise this, if there are no exceptions, is to select all components of the block (PC: Ctrl+A , MAC: Command+A ) and set the properties below to ByLayer in the Properties window):
- Color
- Line Weight
- Transparency
Exception: Earthbag doors and windows details intentionally have varied colors
Exception: Some blocks take intentionally varied line weights, in this example it is not necessary to assign them ByLayer.
- Close out of the block editor by entering BCLOSE from the command prompt and Save the changes
- Periodically review your layer list to meet how much converting is remaining. This would be a proficient time to review the layers past clicking on the Layer Backdrop icon on the Home ribbon.
- Periodically utilise the PURGE control to remove components you accept already addressed. This would be a good time to PURGE . (Come across instruction number 8 for more than details about purging your document)
- Salvage your document. (PC: Ctrl+Shift+S , MAC: Command+S )
AUTOCAD Drawing
- DRAWING:
a. From the Abode ribbon, click on the Layer Properties carte du jour to open the Layer Properties window.
b. Hide all standard template layers
c. Move all remaining items to standard template layers past selecting the particular and clicking on the advisable layer in the Layer drib downwards menu
d. Note, there is a K-MISC (GENERAL-MISCELLANEOUS) layer for items which do not seem to fit into one of the standard template layers. Utilise this category sparingly.
e. From the Layer Backdrop window, hide all layers except 0 . There should be cipher on layer 0 . Move all remaining items on layer 0 to standard template layers.
f. Hide all layers except Defpoints . There should exist cypher on layer Defpoints . Move all remaining items on layer Defpoints to template layers.
chiliad. Notation: motion document text to appropriate subject field text layer (e.g., A-TXT, e.g. G-TXT) or if text is universal to all disciplines motility to layer: TEXT
AUTOCAD TEXT
- TEXT:
There are only three text styles used on the template although it is acceptable to modify the text size if necessary: Standard, Bold, Title. All three text styles are Tahoma Font, non-annotative. One Customs CAD standards practice not use annotative text.
All text styles, other than Standard, Assuming, and Title, must be removed.
Enter QSELECT at the command line and select the following:
- Employ to: Entire cartoon
- Object Blazon: MText
- Properties: Fashion
- Operator: = Equals
- Value: Select a text type you want to change
- Select OK (at present all text with the non-standard text style is selected)

- On the Annotate Ribbon, select Text Way "Standard" (this volition catechumen all selected text to Standard text style)

- PURGE (See pedagogy number eight for more than details about purging your document)
- Repeat until only Standard, Bold, and Title Text styles exist
AUTOCAD DIMENSION STYLES
- Information technology may exist besides necessary to echo this for Object Type= Text
- If you lot believe you have gotten rid of all of a text style but all the same cannot delete it, information technology is generally probable used in a dimension style. To correct this:
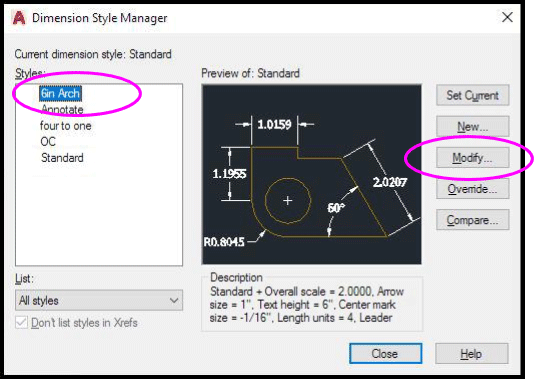
- Enter DIMSTYLE in the control line
- Bank check each Style by clicking on the Manner and selecting the Alter… push
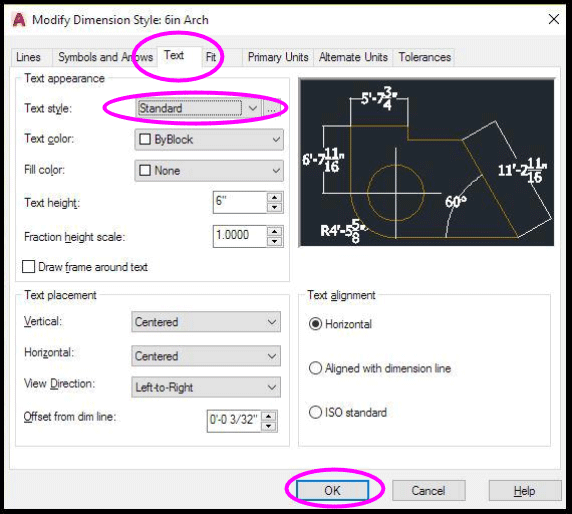
- Click on the Text tab and ensure the Text mode is set to Standard
- Practice this for every Dimension Style
- Now go back and attempt to PURGE that layer (See instruction number viii for more details about purging your document)
RESOURCES AND ADDITIONAL AUTOCAD TIPS
Hither are additional resource and tips we feel may be useful. Use this page (click here) if yous have a resource you lot'd like added here.
- DraftSight is a gratis AutoCAD viewing and editing software
- Autodesk'southward free online file viewer: Autodesk'south free online viewer is keen for viewing AutoCAD, SolidWorks, and/or Revit files online. It produces a shareable link anyone can view and as well allows for taking measurements. Y'all cannot edit files with information technology though
- Using the keyboard to enter commands instead of icons is much more than efficient. Here is an all-encompassing listing of shortcuts: https://www.autodesk.com/store/autocad-shortcuts#
Instead of memorizing short cuts, think nearly what you want to do and begin typing.
 Example: You want to hatch an surface area. Memorize which ribbon the Hatch is located or blazon Hatch and AutoCAD will provide a list of options. Select H (HATCH) from that listing.
If y'all use HATCH frequently plenty that information technology is worth committing to retention, AutoCAD has provided yous the shortcut, H(ATCH) ; next fourth dimension type H at the control line and press Enter .
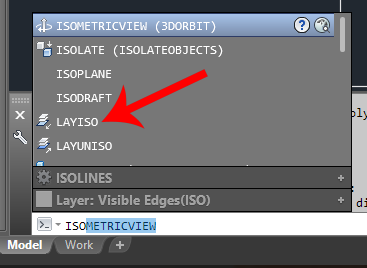
Example: I can never recollect how to isolate a layer; is it ISOLAY, or LAYISO? It doesn't affair, just offset typing and AutoCAD will populate the list of possible options. In this case, I started typing ISO and LAYISO popped up. Select LAYISO from the list.
(Isolating a layer locks all other layers except the one selected, LAYUNISO , restores all layers to their previous state)
If you do not immediately run across the control you expected, the window that pops up is scrollable. See if the control you are looking for is further down the list.
This is besides a expert way to learn new commands since AutoCAD populates a list of commands using the letters y'all enter.
- Ever with efficiency in heed, some commands you will want to memorize. In almost every case I adopt using MTEXT rather than TEXT . How user-friendly that the control for MTEXT is only T . Type T at the command line and printing enter and you lot will create an MTEXT object.
- Some commands that I use all the fourth dimension or that took me forever to figure out once and that I never wanted to take to effigy out once more:
-
- CO: C(OPY) This works differently from the standard shortcut of Ctrl+C . Copy can only copy to the same cartoon but will make multiple copies. Ctrl+C copies to the aforementioned cartoon or any other drawing file but requires the Ctrl+Five command to paste.
-
- Q: Q(SAVE) the drawing ( SAVE is really Save As where you can change the filename and the file location)
-
- DIMSCALE : I always set up DIMSCALE when starting a new cartoon based on the following: http://world wide web.designmaster.biz/support/QandA/HowtoSetDIMSCALE.html This can adjusts text size, leaderhead arrows, and other drawing elements.
-
- LTSCALE : Information technology is also a good thought to set LTSCALE using the same calibration as DIMSCALE . I discovered LTSCALE when the "hidden" line type was not visible because LTSCALE was set also depression.
-
- Sometimes in an active cartoon Z(OOM) > E(XTENTS) , results in a blank screen with a pocket-size dot in the eye. To get rid of this:
- Z(OOM)
- Due east(XTENTS)
- ERASE
- ALL
- R(EMOVE)
- Drag a window effectually the dot in the middle of the screen
- Enter
- Sometimes in an active cartoon Z(OOM) > E(XTENTS) , results in a blank screen with a pocket-size dot in the eye. To get rid of this:
At present attempt Z(OOM) > East(XTENTS) once more and the cartoon should be as expected, rather than a small dot in the center of a black screen.
- TXT2MTXT – Converts TEXT to MTEXT
- MIRRTEXT
-
- 0: Volition NOT mirror text
- 1: Will mirror text
- PDFOSNAP
-
- 1: Volition allow you to snap to objects in a pdf External Reference ( XREF ) object
- IMAGEFRAME, PDFFRAME, DWFFRAME, DNGFRAME, XCLIPFRAME
-
- 0: Not visible, not printed
- 1: Visible and plots
- 2: Displays by does not print
- 3: Various
- LAYFRZ: Freeze layer in a viewport – select the viewport for which you want this layer to be frozen
- VPMAX : Expands the current layout viewport for editing
- VPMIN : Restores the current layout viewport
- Snap To Card Shortcut: Ctrl + RightClick brings up the snap to menu, either click the snap type you lot need or in many instances, type the outset letter snap blazon.
Examples:
East – Endpoint
Thousand – Midpoint
P – Perpendicular
R – Well-nigh
C – Center
- PURGE : Removes unused items, such every bit block definitions and layers, from the drawing
- LAYMRG :Merges selected layers into a target layer; the layer you select to merge into the target layer is deleted
- QSELECT: Creates a pick gear up based on filtering criteria (Example: Select all text of a particular manner)
- The Up Arrow scrolls through previously used commands at the command line. Once you achieve the desired command, printing the Enter primal to first that control.
- Enter repeats the concluding command
SUMMARY
We created a standardized AutoCAD template then that our file names, drawing scales, symbols, layers and layer names, and colors and line weights would match for all our open source designs and the open source designs of others using our designs as a starting bespeak and wanting usa to share their work as well. The Template File includes our Title Block format, standardized layer names and line weights, and nearly ordinarily used symbols within all our drawings. We too created the format with non-AutoCAD users in listen, using colors that show up well in screenshots and fonts that prove up appropriately when using Autodesk's gratis online file viewer. The basic instructions for use with a new drafting project are included in the file download besides.
Ofttimes ANSWERED QUESTIONS
Q: Where do I download the Chief Template File?
Click this link for the Template File: Template File Download
Q: I don't ain AutoCAD, how can I view and apply the file?
For viewing, you can use Autodesk's free online file viewer. For utilize, you tin can download AutoCAD and try it with their complimentary 30-24-hour interval trial. DraftSight is also a free AutoCAD viewing and editing software.

How To Convert Autocad Into A Template,
Source: https://www.onecommunityglobal.org/open-source-autocad-template/
Posted by: goddardpaptur.blogspot.com
0 Response to "How To Convert Autocad Into A Template"
Post a Comment